From Docker to Kubernetes using Minikube remotely
1. Introduction
If you read this blog, you probably saw a few articles related to Docker. Let’s see how we can smoothly transition to Kubernetes.
Using plain Docker containers, you must decide where your containers run, you may need to spread them accross several machines to ensure that your load is spread evenly or ensure redundancy. You need to make sure you have no conflict with ports, etc…
Those are problems a supervisor such as Kubernetes (K8S in short) can take care of.
In this article, we will see how we can transition from using Docker containers to using those containers with a supervisor: Kubernetes. We will however focus on the first step: switching from a single machine’s docker environment into a single machine Kuebernetes environment. Sure we will miss one of the main benefits of Kubernetes which is the management of a cluster of several machines but once we established our simple and cost friendly environment, nothing will prevent us from upgrading to a managed Kubernetes cluster.
This article shows all the steps you need to install a simple Kubernetes environment for a single node. This is not a Kubernetes tutorial but once you are done where, you will be able to follow other tutorial in your very own environment and run your own containers.
2. Tutorial
2.1. Requirements
To follow along, you will need to:
-
have basic knowledge about docker (like running
docker run…) -
know how to use the command line and ssh
-
have an ssh key
-
install packages on your local machine, using homebrew on MacOS for instance
2.2. Get a server
I will be using DigitalOcean for several reasons:
-
One of the most affordable clould provides while keeping a good level of service
-
Super easy to use and friendly user interface
-
Good support & excellent documentation
-
Managed Kubernetes support (so you can later make your dream 100 nodes cluster once your project takes off)
-
If you use DigitalOcean as new user, you get a credit of $100 usable over the next 60 days which is way enough to play with a playground cluster made of a few nodes.
You should pick a minimum of 2vCPU and 4GB.
|
Note
|
You could deploy a managed cluster with one or two Droplets with 1vCPU and 2GB but you cannot run much more than the cluster itself and a few simple containers. Remember that Kubernetes keeps track of the resources to garanty that everything runs smoothly and you also need a bit of buffer when you modify your configuration (which you will) as Kubernetes will first spin up new containers and then purge the old ones. You will need some head room. |
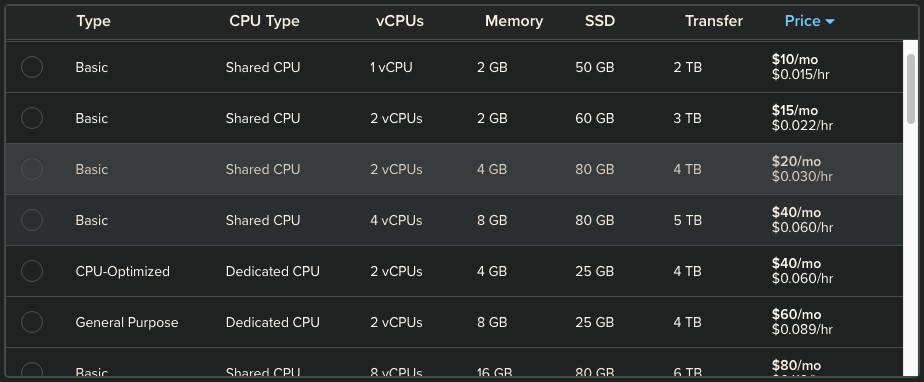
With the credit from this link, you can run a 4vCPU with 8GB of RAM 24/7 for 2 months with extra block storage entirely for free.
|
Important
|
In this arcticle, we are NOT creating a Kubernetes managed cluster. While we could do that in a few clicks, here we will be using a single Droplet and Minikube. More on that later. |
Let’s get a few of the basic steps behind us:
First create the droplet and provide your ssh key. This is straight forward. Take note of your public IP. If you need some help with that, check out this article. The article also show how to create an ssh key if you don’t have one yet.
2.3. Prepare your local machine
While your droplet is starting (it only takes a few seconds), you can install kubectl on our local machine, we will need it later to access and control our Kubernetes cluster and resources:
brew install kubectl
If you are not using a Mac, you may check out this documenation.
kubectl is the tool you will be using to query your cluster, create resources, monitor, etc…
We will now login on this server. I will call it minikube. We can add an entry in ~/.ssh/config to make it more convenient:
host minikube
   Hostname 111.22.333.111       <= change with the public IP of your Droplet
   Port 22
   User will                     <= yes, you may pick your own name here :)
   IdentityFile ~/.ssh/id_rsa
2.4. Prepare the server
We log in first with ssh root@minikube.
|
Note
|
We provide root@ since our user does not exist yet and the ssh config above points to a yet non existent user will.
|
Let’s first store your name in a variable so all the scripts work with your name without you having to fix all the commands:
export ME=will
We then update and install a few utilities:
apt update
apt upgrade -y
apt install -y apt-transport-https gnupg2 tree curl nmap jq
curl -s https://packages.cloud.google.com/apt/doc/apt-key.gpg | sudo apt-key add -
echo "deb https://apt.kubernetes.io/ kubernetes-xenial main" | tee -a /etc/apt/sources.list.d/kubernetes.list
apt-get update
apt-get install -y kubectl
adduser $ME
mkdir -p /home/$ME/.ssh && chown -R $ME /home/$ME && chgrp -R $ME /home/$ME
|
Note
|
While we don’t have to install kubectl locally, it remains convenient for some initial tests in our tutorial. You can find more in the official kubernetes documentation.
|
We will now install Docker, follow the guide and run Step 1 and Step 2 from Install Docker and make sure to run the optional Step 2 so you can run docker without having to prepend the sudo keyword. In this step, replace ${USER} by ${ME}.
|
Note
|
You may skip everything after Step 2 although if you never used Docker, this is worth your time. |
Now copy your ssh public key for the new user:
cp -rf ~/.ssh /home/$ME/; chown -R $ME /home/$ME; chgrp -R $ME /home/$ME
usermod -aG sudo $ME
Logff and log back in as non-root, this time, we can simply run:
ssh minikube
To make sure everything worked so far, lets test our docker installation:
docker run -d -it --name web -p 80:80 nginx
This command will show Unable to find image 'nginx:latest' locally. This is normal. It will then download the nginx image. It then returns immediately after showing a long hash you can ignore. We now have a web server (nginx) running and locally serving http requests on port 80. Let’s check:
curl -I http://localhost:80/
You should see:
HTTP/1.1 200 OK
Server: nginx/1.19.6
Date: Mon, 08 Feb 2021 21:00:45 GMT
Content-Type: text/html
Content-Length: 612
Last-Modified: Tue, 15 Dec 2020 13:59:38 GMT
Connection: keep-alive
ETag: "5fd8c14a-264"
Accept-Ranges: bytes
At that point, if you don’t know what is nginx, don’t worry about it. The point here was just to test 'some' Docker container and make sure everything is working fine.
We no longer need this container, let’s remove it:
docker rm -f web
2.5. Supervisors
If you do some research, you will find many Kubernetes supervisors. Here are a few:
I am sure you can find some more. All of those do (almost) the same thing: they expose a standard API and allow supervising a cluster of nodes on which you will run your containers.
There are however big differences with the solutions linked above:
-
Some are meant and restricted to be running on a single node
-
The Virtualization solution used under the hood may vary
We will be using minikube, which is considered as a local development solution.
If you want a robust Production Kubernetes cluster, it will have to run on multi nodes cluster to ensure redundancy. The control plane managing your cluster will also need to be redundant.
That being said, there is nothing wrong with going from a non-redundant setup where few containers run unsupervised to a still-non-redundant setup where you start supervising your containers.
2.6. Install minikube
minikube is a mini-kubernetes cluster typically used for local development. It runs on a single machine and this perfect for our start. Let’s install it on our server.
curl -LO https://storage.googleapis.com/minikube/releases/latest/minikube_latest_amd64.deb
sudo dpkg -i minikube_latest_amd64.deb
|
Warning
|
I know this is tempting but do NOT start minikube yet.
|
Let’s store the public IP of our server:
export MY_IP=`curl ifconfig.co`
echo $MY_IP
Now we can start minikube:
minikube start --apiserver-ips=$MY_IP
|
Important
|
Providing the --apiserver-ips flag is very important for later as it creates the certificate we need to access minikube remotely. If you did start minikube without this flag, you need to run minikube delete and run the command above again.
|
At that point, we have a Kubernetes cluster up and running and by the way, it is running into a single docker container:
$ docker ps
CONTAINER ID   IMAGE                   COMMAND                  CREATED        STATUS        PORTS                            NAMES
354b2b937666   <...>/kicbase:v0.0.17   "/usr/local/bin/entr…"   28 hours ago   Up 28 hours   <...>127.0.0.1:49189->8443/tcp   minikube
While we don’t really need kubectl on the server (we will later only use it from our local machine), it can help to troubleshoot and ensure everything is working fine locally.
kubectl is the command you will need to control your cluster. It connects to the API Server started by minikube on port :8443.
For now, let’s use kubectl from the server and run a simple query:
kubectl get namespaces
It should return something like:
NAME                   STATUS   AGE
default                Active   28h
kube-node-lease        Active   28h
kube-public            Active   28h
kube-system            Active   28h
|
Tip
|
Typing kubectl gets old after a while. Feel free to alias it with: alias k='kubectl' and use k instead of kubectl in the following commands.
|
While this is all good, usually one does not ssh into the cluster to control it. There are a few issues we need to solve in order to reach the minikube api server remotely. The first issue is that the firewall of our VPS let only traffic go through on port :22. This is a default safe practise.
Traffic on any other port will be blocked as shown below.

So let’s now see the options we have to connect and control our Kubernetes remotely:
-
ssh tunnel
-
proxy
2.7. Using a ssh tunnel
Using a ssh tunnel is both convenient and secure. It allows accessing network resources (an API, a web server, a database, etc…) available on a remote server, as if it would be running locally on our machine.
All we need is the ability to connect to the server via ssh.

-
You will NOT need to change anything related to your Cloud firewall
-
You will NOT need to change anything related to your soft firewall such as iptables
We will need to establish the tunnel everytime we want to use it. We will see some options to do that.
2.7.1. Using the command line
We can establish a tunnel using the following command on our local dev machine:
ssh -N -p 22 <user>@<public_ip> -L 127.0.0.1:18443:<minikube_ip>:8443
where:
-
useris your name -
public_ipis the public IP of your server -
minikube_ipis the IP address of minikube, you can find it on the server using the commandminikube ip. It will likely be192.168.49.2.
This command will not exit and remain active. We will be able to test after we configured kubectl. Keep reading.
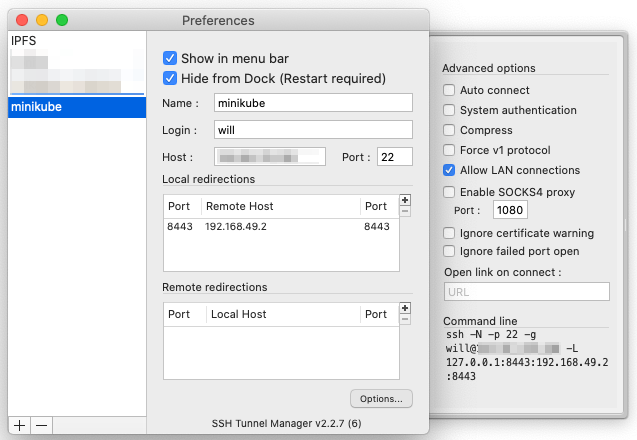
2.7.2. Using a GUI
If you are using a Mac, you may also check out SSH Tunnel Manager. It is a GUI that allows you creating, enabling and disabling tunnels with a single click.
|
Tip
|
You may forward several ports inside your tunnel and if one of those ports serves http(s) traffic, you may let SSH Tunnel Manager open the URL automatically as soon as the tunnel is established. |
The following diagram shows an example where we access the tunnel locally on port :8080 to reach the port :80 on the remote server.

If you are not familiar with Port Forwarding, this is something very cool you should check out! As soon as your tunnel is established, it looks like your local machine is running a server on the exposed port whereas we actually reach the server on the remote machine.
2.8. Using a proxy
Using a proxy is much more comfortable to access your Kubernetes cluster since you can "just use it"TM without having to establish a ssh tunnel as we just saw. Comfort does not come at the cost of security here. Your remote minikuke created some certificates (like a VPN would do for instance) and only users with valid certificates will be able to access the remote minikube.
It requires however a few preparation steps related to the networking. For now, as we saw previously, we cannot reach ANY port but :22 on the remote server. Even if we open our cloud firewall for :8443, we will NOT reach the minikube API server.

You may have spotted the reason earlier, let’s have a look at minikube, which runs in a docker container btw:
  $ docker ps
  CONTAINER ID   IMAGE   COMMAND   CREATED   STATUS  PORTS                            NAMES
  354b2b937666   <...>   <...>     <...>     <...>   <...>127.0.0.1:49189->8443/tcp   minikube
The problem lays in this 127.0.0.1:49189→8443/tcp: inside the container, the api server runs on port :8443. This port is exposed but only available on the local interface 127.0.0.1.
We need a solution to expose the API server to the outside world and a simple option is to use an additionnal container: Minikube Proxy Docker Image.
This container will allow the following:

You can visit the Repo on Gtilab to learn more but here is the tldr;, a command to run on the remote server :
docker run -d -it --network minikube --name minikube-proxy \
  --restart unless-stopped -p 18443:18443 chevdor/nginx-minikube-proxy
This container plays the spy by joining the minikube network from the inside!
If we strip what is not critical in this command, we are left with:
docker run -d --network minikube -p 18443:18443 chevdor/nginx-minikube-proxy
-
--network minikubeis critical, without it, our extra container will not be able to talk with the minikube API server -
-p 18443:18443is also critical to access the port:18443. This is the default port our proxy is exposing
|
Note
|
You can modify the default port, check out the Repo on Gtilab to learn more. |
You may check that the container called minikube-proxy is now running with docker ps.
2.9. Setup kubectl on our local machine
At that point, make sure you added a Firewall rule to allow traffic on port :18443.
|
Important
|
The minikube API server is serving on port :8443 but we want to connect to our proxy and it opens :18443.
|
We installed kubectl on our local machine already, we will now need to tell it how to connect to the remote minikube and we will need the following:
-
ip of the server
-
port of the server
-
a Certificate Authority (CA, created by
minikube) -
a client certificate (created by
minikube) -
a client-key (created by
minikube)
We will now be working on our local machine. Open a new shell there.
Since we need to fetch a few files from our server, let’s define a location for that and create the folder:
export MY_MINIKUBE=~/k8s/minikube/test
export MY_SRV="minikube"
export MY_IP=111.22.333.111               # replace this with the IP of your server
mkdir -p $MY_MINIKUBE
Let’s make sure you have all you need: running env | grep MY_ should show 3 variables:
MY_MINIKUBE=/Users/<your_name>/k8s/minikube/test
MY_SRV=minikube
MY_IP=11.22.33.44
Now let’s fetch the CA, the client certificate and key:
scp minikube:~/.minikube/ca.crt $MY_MINIKUBE
scp minikube:~/.minikube/profiles/minikube/client.{key,crt} $MY_MINIKUBE
You should now have the following files:
$ tree $MY_MINIKUBE
/Users/<your_name>/k8s/minikube/test
├── ca.crt
├── client.crt
└── client.key
0 directories, 3 files
We should now have everything we need locally. Let’s create a context that will allow kubectl to know where and how to connect to our server.
Before we start, you may want to see your current config. It is located in ~/.kube/config but you don’t need to remember that, kubectl can show it to you:
kubectl config view
If you installed docker desktop, you likely see the following. If you did not install Docker Desktop on your machine, the list will be empty, that’s fine:
kubectl config get-contexts
CURRENT   NAME                        CLUSTER                     AUTHINFO                          NAMESPACE
*         docker-desktop              docker-desktop              docker-desktop                    kube-system
At that point, if we would not have paid attention earlier, we would have to ignore tls handshake with --insecure-skip-tls-verify but we can do better.
Make sure you did define all the ENV we need with env | grep MY_. If you see your 3 variables, you can move on.
You may also want to check that you did not create a context with the name we will use. The following should return nothing:
kubectl config get-clusters | grep $MY_SRV
Let’s tell kubectl about our server:
kubectl config set-cluster $MY_SRV --server https://$MY_IP:18443 --certificate-authority=$MY_MINIKUBE/ca.crt
Out cluster is now known:
kubectl config get-clusters | grep $MY_SRV
We now need a user and minikube created it one for us, called minikube:
kubectl config set-credentials minikube --client-certificate=$MY_MINIKUBE/client.crt --client-key=$MY_MINIKUBE/client.key
We are almost done, we now need to put that alltogether as a context:
kubectl config set-context $MY_SRV --cluster=$MY_SRV --namespace=default --user=minikube
We now tell kubectl to USE that new context:
kubectl config use-context $MY_SRV
Your new context should now show upt with:
kubectl config get-contexts
2.10. Play!
Let’s now finally use that cluster a little bit!
Let’s first see how to create and start a pod. A pod may run one or more containers. All the containers in a pod can communicate using localhost. This is convenient if you have container tighly related. For our example, we create a pod with one nginx container:
The Kubernetes (close) equivalent to:
docker run -d --name web -p 80:80 nginx
looks like:
kubectl run web --image=nginx --restart=Never
You may wonder about that --restart=Never and may remember using --restart=Always when using Docker. Kubernetes can manage the life cycle of your pods and containers. Unless you provide this --restart=Never, Kubernetes will created additionnal resources to take care of restarting and scaling as required.
After sending this command, you will want to see your pod. You may spam some kubectl get pods or:
kubectl get pods --watch
Let’s delete this pod now:
kubectl delete pod web
Before we create more on our cluster, let’s create a namespace to keep things organized and tiddy. You can see that as a folder and all the Kubernetes you will created will be located in this namespace. Later you can view only the resources in your namespace without be polluted by the view of other resources from your colleagues for instance.
kubectl create namespace demo
kubectl config set-context --current --namespace=demo
You can then query the list of namespaces with:
kubectl get namespaces
or save some typing with:
kubectl get namespace
or even:
kubectl get ns
Now everything we create will be located under the demo namespace.
What we called resources so far is named a Workload and Kubernetes defines several types of workloads.
While creating them using the command line, it becomes quickly cumbersome. Instead, we can tell kubectl to apply what is described in a file. It can use yaml or json.
Let’s have a look at our previous created demo namespace:
kubectl get ns demo -o yaml
Here is an example to create (again!) our web pod running one nginx container:
apiVersion: v1
kind: Pod
metadata:
  name: web
  labels:
    name: web
spec:
  containers:
  - name: web
    image: k8s.gcr.io/nginx-slim:0.8
    resources:
      limits:
        cpu: 50m
        memory: 32Mi
    ports:
      - containerPort: 80
Tip: You will likely find a plugin for your favorite editor that will help you compose those spec files.
|
Note
|
You may have noticed that I used a sligtly different image in this example. This image is more 'monitoring' friendly. |
You can copy the content shown above in a pod.yaml file anywhere on your local machine. Now let’s apply those specs:
kubectl apply -f pod.yaml
So far, we deployed neither something fancy nor vers Kubernety, let’s do better !
apiVersion: apps/v1
kind: Deployment
metadata:
  name: api
spec:
  replicas: 3
  selector:
    matchLabels:
      app: api
  template:
    metadata:
      labels:
        app: api
    spec:
      containers:
      - name: api
        image: k8s.gcr.io/nginx-slim:0.8
        resources:
          limits:
            memory: 32Mi
            cpu: 50m
        ports:
        - containerPort: 81
---
apiVersion: v1
kind: Service
metadata:
  name: myapi
spec:
  type: NodePort
  selector:
    app: api
  ports:
  - port: 81
    targetPort: 81
As before, you can create this deployment.yaml anywhere and run:
kubectl apply -f deployment.yaml
Asking for the list of pods with kubectl get pods --watch, we can see that we have now 3 pods running a pretented api:
kubectl get pods
NAME                   READY   STATUS              RESTARTS   AGE
api-584cd45cc7-86tvx   1/1     Running             0          4s
api-584cd45cc7-dhdck   1/1     Running             0          4s
api-584cd45cc7-jxxnh   1/1     Running             0          4s
web                    1/1     Running             0          7s
Now run the following from another terminal and come back:
kubectl delete pod api-<pick_an_id_in_your_list_of_pods>
You will see that one pod gets deleted but since we asked the replicat-set to keep 3 instances up, a new pod will immediately be spawned and replace the one that died.
2.11. Install goodies
Your Kubernetes cluster is running but would that not be great to see what is going on using the Kubernetes Dashboard?
Would that not be greater to see fancy charts and metrics?
2.11.1. Dashboard
We will not miss out on that, especially because minikube makes it really simple: you may run the following once in your server:
minikube dashboard
It will install the Dashboard and start a proxy to access it. But you can stop it right away and start the proxy again from your local machine:
kubectl proxy
The Dasboard will then be visible locally at: http://localhost:8001/api/v1/namespaces/kubernetes-dashboard/services/http:kubernetes-dashboard:/proxy/#/overview?namespace=default
2.11.2. Metrics
minikube ships with a few handy addons:
minikube addons list
Let’s enable the metrics-server:
minikube addons enable metrics-server
After 1 to 2 minutes, your Dashboard will start shining with awesome charts. Checkout at http://localhost:8001/api/v1/namespaces/kubernetes-dashboard/services/http:kubernetes-dashboard:/proxy/#/pod?namespace=demo

3. Wrap-up
We have seen many things in this long article:
-
how to install minikube on our server on DigitalOcean
-
2 solutions to use
kubectllocally and reach our cluster -
we played a bit with our new Kubernetes cluster
Wilfried Kopp aka. Chevdor
Building Blockchains & Decentralized Solutions
I build decentralized solutions and tooling to support them. I am developing Smart Contracts and dApps on Ethereum and developing tooling for Substrate (Polkadot & Kusama). I love Rust! I am using Docker extensively and above all I like efficiency. GPG Fingerprint 15AF C574 D3F9 F1C3 CCDD E31E 2DCE C4DC 506E 6475.