Your very own local Polkadot & Substrate network in less than 30s


Substrate & Polkadot are new Blockchain technologies programmed in a rather new but ultra safe language called Rust. If you follow the official guides in the Polkadot and Substrate repositories, you will rather quickly realise that being a developer and knowing Rust are strong requirements. While Rust is definitely the best choice for the job, it makes it harder when programming Rust or programming at all is not your focus.
A while back, I published an article called A syncing Polkadot node under 30s. The motivation behind this first article was to allow anyone getting started with Polkadot & Substrate with as little programming background as possible or even without any knowledge Rust. The solution leverages the abstraction brought by Docker containers.
In order to follow along this new article, you may want to start by installing Docker. You can use the official documentation for your platform at https://docs.docker.com/install/
If you issue the following command(s):
docker --version; docker-compose --versionyou should see something similar to:
  Docker version 18.09.2, build 6247962
  docker-compose version 1.23.2, build 1110ad01
Don’t worry if you do not get the exact same versions, anything decently recent will do.
1. Running a single node
Running a single node was made much easier thanks to the use of Docker images. A single command allows you to get a node up and running in a few seconds as explained in A syncing Polkadot node under 30s.
In order to test your implementation, you may be satisfied with a single node. In those cases, you may use the dev chain as shown below:
docker run --rm -it chevdor/polkadot polkadot --devAs a result, you should see a running node after a few seconds:
  2019–05–09 13:59:02 Running in — dev mode, RPC CORS has been disabled.
  2019–05–09 13:59:02 Parity Polkadot
  2019–05–09 13:59:02 version 0.4.0-f0132e2-x86_64-linux-gnu
  2019–05–09 13:59:02 by Parity Team <admin@parity.io>, 2017–2019
  2019–05–09 13:59:02 Chain specification: Development
  2019–05–09 13:59:02 Node name: divergent-coast-4277
  2019–05–09 13:59:02 Roles: AUTHORITY
  2019–05–09 13:59:02 Initializing Genesis block/state (state: 0xf24e…0503, header-hash: 0x5959…1da6)
  2019–05–09 13:59:02 Loaded block-time = 4 seconds from genesis on first-launch
  2019–05–09 13:59:02 Loading GRANDPA authority set from genesis on what appears to be first startup.
  2019–05–09 13:59:02 Best block: #0
  2019–05–09 13:59:02 Local node identity is: ...
  2019–05–09 13:59:02 Libp2p => Random Kademlia query has yielded empty results
  2019–05–09 13:59:02 Listening for new connections on 127.0.0.1:9944.
  2019–05–09 13:59:02 Using authority key ...
  2019–05–09 13:59:04 Starting parachain attestation session on top of parent 0x5959c7f8...4f4d1c697b91da6. Local parachain duty is Relay
  2019–05–09 13:59:04 Prepared block for proposing at 1 [hash: 0xde1f9e...44489d03; parent_hash: 0x5959…1da6; extrinsics: [0xf389…ccb5, 0x4e1d…edc2]]
  2019–05–09 13:59:04 Pre-sealed block for proposal at 1. Hash now 0xbfe8ff5...40b459e8a3, previously 0xde1f9e0f...c244489d03.
  2019–05–09 13:59:04 Imported #1 (0xbfe8…e8a3)
This dev chain, while being a great tool for developers, is however far from the real thing.
2. Give me moar!
Blockchains and decentralized systems don’t make much sense unless many participants are involved so you may want to have several nodes. This is what you get if you run your nodes within existing networks such as Alexander.
On those public test networks however, you are not fully in control and your funds are limited. Running a chain locally has many benefits if you want to experiment and learn. There is a flag for that, it is called a local chain.
docker run --rm -it chevdor/polkadot polkadot --chain localAs much as I would like to make it simple, this becomes a little harder at that point solely using Docker. Starting many local chains is not enough to have them talk to each other. Docker does allow linking containers but we will see how to make it really really easy.
If you have time and patience, you may read this gist and see all the tricks… or keep reading here and simply make a couple of copy/paste.
In order for the next steps to work properly, let’s start with a little cleanup. This is especially important if you start seeing error messages. Here is a set of magic cleanup commands to get started:
  docker ps -a | grep "polkadot\|substrate" | awk '{print $1}' | xargs docker stop | xargs docker rm

  docker network ls | grep "polkadot\|substrate\|tmp" | awk '{print $1}' | xargs docker network rm

docker volume ls | grep "polkadot\|substrate\|tmp" | awk '{print $2}' | xargs docker volume rm|
Note
|
You may find it easier to copy/paste from here |
Running those 3 commands will perform the following:
-
Find, stop and delete any docker container related to “polkadot” or “substrate”
-
Delete any docker network created by the commands we will run later on
-
Delete any docker volume related to “polkadot” or “substrate”
|
Note
|
Those commands are safe to run: they delete only docker related stuff and will simply do nothing if you never did anything polkadot or substrate related on docker before. |
3. Local Polkadot network with 2 nodes
Let’s start simple, with a local polkadot network made of 2 nodes. You could clone my gist and enter commands but that would be assuming you have git, know and want to use it, etc… Let’s skip this requirement entirely as well.
So here is the challenge: we want to bring a local polkadot network on your machine with one single ‘command’ (well ok… there are 2 commands but I fit them on a single line :)):
wget https://gist.githubusercontent.com/chevdor/be461d11c56baecb0e7bbcb920e964fb/raw/855b75b18a2e8f05b19633b2bbd8f00887aa9300/dcp-polkadot-2nodes-noui.yml -O /tmp/dcp-local.yml && docker-compose -f /tmp/dcp-local.yml up --force-recreateThis is a little verbose but what is going on there?
First, we download a docker-compose config into your /tmp folder. On Windows you probably need to adapt your paths. We then pass that to docker-compose and ask it to do the magic, that is, start several docker containers and link them as required.
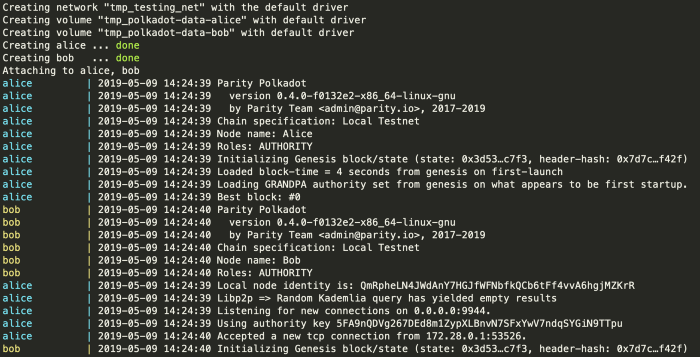
After a few seconds of download, you will see your 2 nodes. Congratulations, this copy/paste allowed you to run your own local blockchain network!
4. Moar Moar Moar!
We got our 2 nodes network to run, yeah! What now? I guess you want to see blocks, make transactions, swap runtimes, abuse the democracy module, see the money… :)
Here is the good news, all fo that comes for free, we just need another one-liner:
wget https://gist.githubusercontent.com/chevdor/be461d11c56baecb0e7bbcb920e964fb/raw/855b75b18a2e8f05b19633b2bbd8f00887aa9300/dcp-polkadot-2nodes-ui.yml -O /tmp/dcp-local.yml && docker-compose -f /tmp/dcp-local.yml up --force-recreate|
Note
|
Although it looks similar, you will notice that it is not the command we just used. The hash is different and the filename is also another one. Make sure you copy the whole line. |
Now is the time to point your browser to http://localhost/. In the settings tab, make sure you are pointing at the right chain:
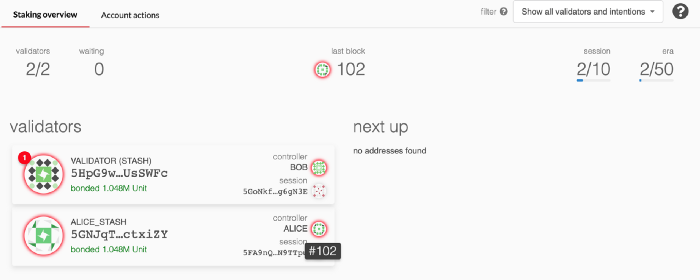
Then enjoy seeing your network running through the eyes of your Alice node:
You could have a look at the staking tab and see the validators work hard to produce blocks.
Did you notice already that you can control the Alice account and that you are rather wealthy? Nothing better than sending 42'000 DOTs to Bob to check it out.
5. Why stop with 2 nodes when you can have more?
How about we now start 5 nodes? That would be perfect to test how validators behave, stake, un-stake, nominate, etc…
I guess you know how it works by now:
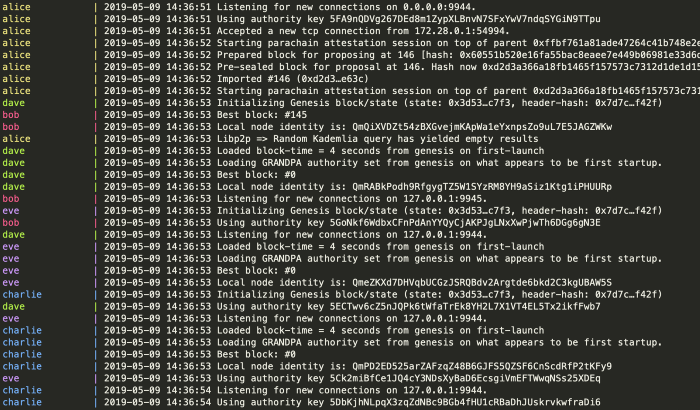
wget https://gist.githubusercontent.com/chevdor/be461d11c56baecb0e7bbcb920e964fb/raw/855b75b18a2e8f05b19633b2bbd8f00887aa9300/dcp-polkadot-5nodes-ui.yml -O /tmp/dcp-local.yml && docker-compose -f /tmp/dcp-local.yml up --force-recreateYou now get your 5 nodes running:
and the UI is still available at http://localhost/
6. Custom runtime, Ink! and Smart Contracts
This is starting to be fun, let’s not stop there yet.
How about a substrate network with 2 nodes and a UI? Before we do that, let’s wipe our previous Polkadot containers so we can start with an empty chain:
  docker ps -a | grep "polkadot\|substrate" | awk '{print $1}' | xargs docker stop | xargs docker rm

  docker network ls | grep "polkadot\|substrate\|tmp" | awk '{print $1}' | xargs docker network rm

  docker volume ls | grep "polkadot\|substrate\|tmp" | awk '{print $2}' | xargs docker volume rm
Now is the time for some Substrate fun:
wget https://gist.githubusercontent.com/chevdor/be461d11c56baecb0e7bbcb920e964fb/raw/f10ebbe5b51f54e75cc06e14cf3a2f521b231cd9/dcp-substrate-2nodes-ui.yml -O /tmp/dcp-local.yml && docker-compose -f /tmp/dcp-local.yml up --force-recreateNow that we got so far without touching a single line of code or learning Rust, you still may want to learn this amazing language and start writing Smart Contracts using Ink! Your local UI is already waiting for you.
7. Further reading:
Nicole Zhu compiled an awesome list about everything Substrate and Polkadot. Highly recommended, come back once you read it all :)
Shawn Tabrizi wrote a really cool Ink! tutorial on how to write Smart Contracts for Substrate.
You may prefer to write your own Runtime, hot-swap it in your current local chain. Shawn´s got your back with a very entertaining Substrate Cryptokitties Rutime tutorial.
If you want to talk to real people, you may want to stop by in the Polkadot-Watercooler channel.
A few more:


