IPFS and Docker
With IPFS, you can share files without the need for a centralized product such as Dropbox, Google Drive and Co. That means that you need no account, you have no size or bandwidth limits…
It makes sharing files convenient and very secure. Indeed users cannot modify a file after submitting it. This is due to the fact that IPFS references content using hashes of the content itself and not urls. This article provides a quick introduction to what IPFS is and shows how to install and use it thanks to Docker.
Keep in mind that IPFS is not encrypting any content. If you share secrets on IPFS and someone is lucky enough to guess the hash of your data, they would access your secrets. You may however, share on IPFS content that you encrypted.
1. IPFS Intro
1.1. IPFS vs Online file sharing solutions
Let’s take the example of Dropbox. I could share with you a file with some content as http://somedropboxlink.com/myfile.pdf. After sharing this file with you, I am free to modify the content. The link will remain valid but what you get when downloading the file will depend on WHEN you download it. If you consider some sort of contractual agreement, this is not a nice property.
Using IPFS, things are different. When sharing a file over IPFS, the content you get from a given link is guaranteed to be always exactly the same. I no longer can sneak changes into the contract after sharing it with you :)
1.2. Using the IPFS Gateway
You do not need to install anything to view and retrieve files from the IPFS network. This is possible thanks to the IPFS Gateway hosted at https://ipfs.io.
Opening this link in your Browser will show exactly the following content:
Hello and Welcome to IPFS!

██╗██████╗ ███████╗███████╗
██║██╔══██╗██╔════╝██╔════╝
██║██████╔╝█████╗  ███████╗
██║██╔═══╝ ██╔══╝  ╚════██║
██║██║     ██║     ███████║
╚═╝╚═╝     ╚═╝     ╚══════╝

If you're seeing this, you have successfully installed
IPFS and are now interfacing with the ipfs merkledag!

 -------------------------------------------------------
| Warning:                                              |
|   This is alpha software. Use at your own discretion! |
|   Much is missing or lacking polish. There are bugs.  |
|   Not yet secure. Read the security notes for more.   |
 -------------------------------------------------------

Check out some of the other files in this directory:

  ./about
  ./help
  ./quick-start     <-- usage examples
  ./readme          <-- this file
  ./security-notes
CONGRATULATIONS! You just used IPFS!
When I say exactly, this time it will NOT depend on when you open the URL. In 10 years from now, when opening this IPFS link, the content will be either no longer available, or if it is available, exactly the same.
If someone would modify the content, even a very small change such as adding a space, it would modify the hash you see at the end of the URL. So the original content remains available at the original URL (which is mainly the IPFS hash) and the new content become available at a NEW url (= new IPFS Hash).
1.3. Data availability
You may wonder why the data would then no longer be available?
IPFS is a peer to peer network. When you request a document, your peer (or the IPFS gateway when using the link above) is asking peers around whether someone has the content. If yes, your peer will fetch it, keep it for a while, and returned it. if you need this content again, your peer will already have it (for a while, depending on the configuration of your node).
If no peer has the content matching the hash, no data can be returned. It is up to the peers to decide what is 'interesting content' and how long to keep it.
There is a way to tell your IPFS node to PIN data. It means that we tell our node that some piece of data is important and we want to keep it forever so that it remains available through the network.
2. Using IPFS
There is nowadays a very simple way to use IPFS. You can download the IPFS Desktop from the link below: https://github.com/ipfs-shipyard/ipfs-desktop/blob/master/README.md
This will install and IPFS node on your machine as well as a little utility allowing you to interact with the node. That makes using IPFS very straight forward.
After installing this utility, you may 'add a file to IPFS' with a simple drag&drop. This utility even allows you to add your screenshots automatically to IPFS. That can be convenient!
But keep in mind that any of the file you share will only be available as long as your machine and your IPFS nodes are available. If you turn your computer off and no other peer has your data, people will no longer be able to access your content until your node comes back online.
For this reason, it may be interesting to run IPFS on a server that is running 24/7.
3. Running an IPFS node 24/7
Running IPFS on a server that is available 24/7 is very valuable. First of all, all the content you want to make available will always be available. But you also contribute and help the network by making some popular content available.
3.1. IPFS using Docker
The number of Docker related articles on my blog is rapidly growing because Docker makes it very straight forward to run any service, especially if you want to test things out.
Installing IPFS on a new server does require a few steps as you can see here: https://ipfs.io/ipfs/QmR7tiySn6vFHcEjBeZNtYGAFh735PJHfEMdVEycj9jAPy/docs/install/
|
Note
|
The IPFS documentation is stored… well… on IPFS! |
In short, you will need to install some GOLANG stuff, tweak a bit your system, tell the IPFS daemon to start as service, take care of the access rights, etc… I am not sure about you but I seldom have the time or the patience to deal with all of that…
Installing Docker on a server also requires a few steps but once this is done, Docker really makes it simpler.
Here is how you can run an IPFS node on your server and access the ipfs command running inside your Docker container.
First, you will need to connect to your server using ssh.
We will now create 2 folders. I know you hate copy/pasting so here it is as a single line:
mkdir -p $HOME/ipfs/staging; mkdir -p $HOME/ipfs/data
If you have the tree command on your system, it will show:
  $ tree -d -L 1 $HOME/ipfs
  /home/will/ipfs
  ├── data
  └── staging

  2 directories
We are now ready for the docker part. While the line is a little longer, it is also rather straight forward and you should have problem with that as long as you installed Docker properly:
docker run -d --name ipfs -v $HOME/ipfs/staging:/export -v $HOME/ipfs/data:/data/ipfs -p 4001:4001 -p 127.0.0.1:8080:8080 -p 127.0.0.1:5001:5001 ipfs/go-ipfs:latest
That’s it! We are done :) IPFS is now running.
But how can we use it? I could give you a few docker commands to do that here but that is rather longer and boring. Let’s make an alias that will make things much easier. I am naming my alias dipfs (for docker-ipfs) since I have an old ipfs command on my system. If you don’t, you may replace dipfs by ipfs in the commands below:
alias dipfs='docker exec ipfs ipfs'
In order for this alias to be persistent, you need to add it to your .bashrc. Here is another one-liner:
echo "alias dipfs='docker exec ipfs ipfs'" >> ~/.bashrc; source ~/.bashrc
We now can use our new command. Let’s check out the help command first:
$ dipfs --help
USAGE
  ipfs  - Global p2p merkle-dag filesystem.

SYNOPSIS
  ipfs [--config=<config> | -c] [--debug | -D] [--help] [-h] [--api=<api>] [--offline] [--cid-base=<base>] [--upgrade-cidv0-in-output] [--encoding=<encoding> | --enc] [--timeout=<timeout>] <command> ...

OPTIONS

  -c, --config               string - Path to the configuration file to use.
  -D, --debug                bool   - Operate in debug mode.
  --help                     bool   - Show the full command help text.
  -h                         bool   - Show a short version of the command help
                                      text.
 <... truncated ...>

  EXIT STATUS

  The CLI will exit with one of the following values:

  0     Successful execution.
  1     Failed executions.

  For more information about each command, use:
  'ipfs <subcmd> --help'
|
Note
|
The documentation mentions the ipfs. In my case, it is dipfs.
|
Now let’s fetch some content:
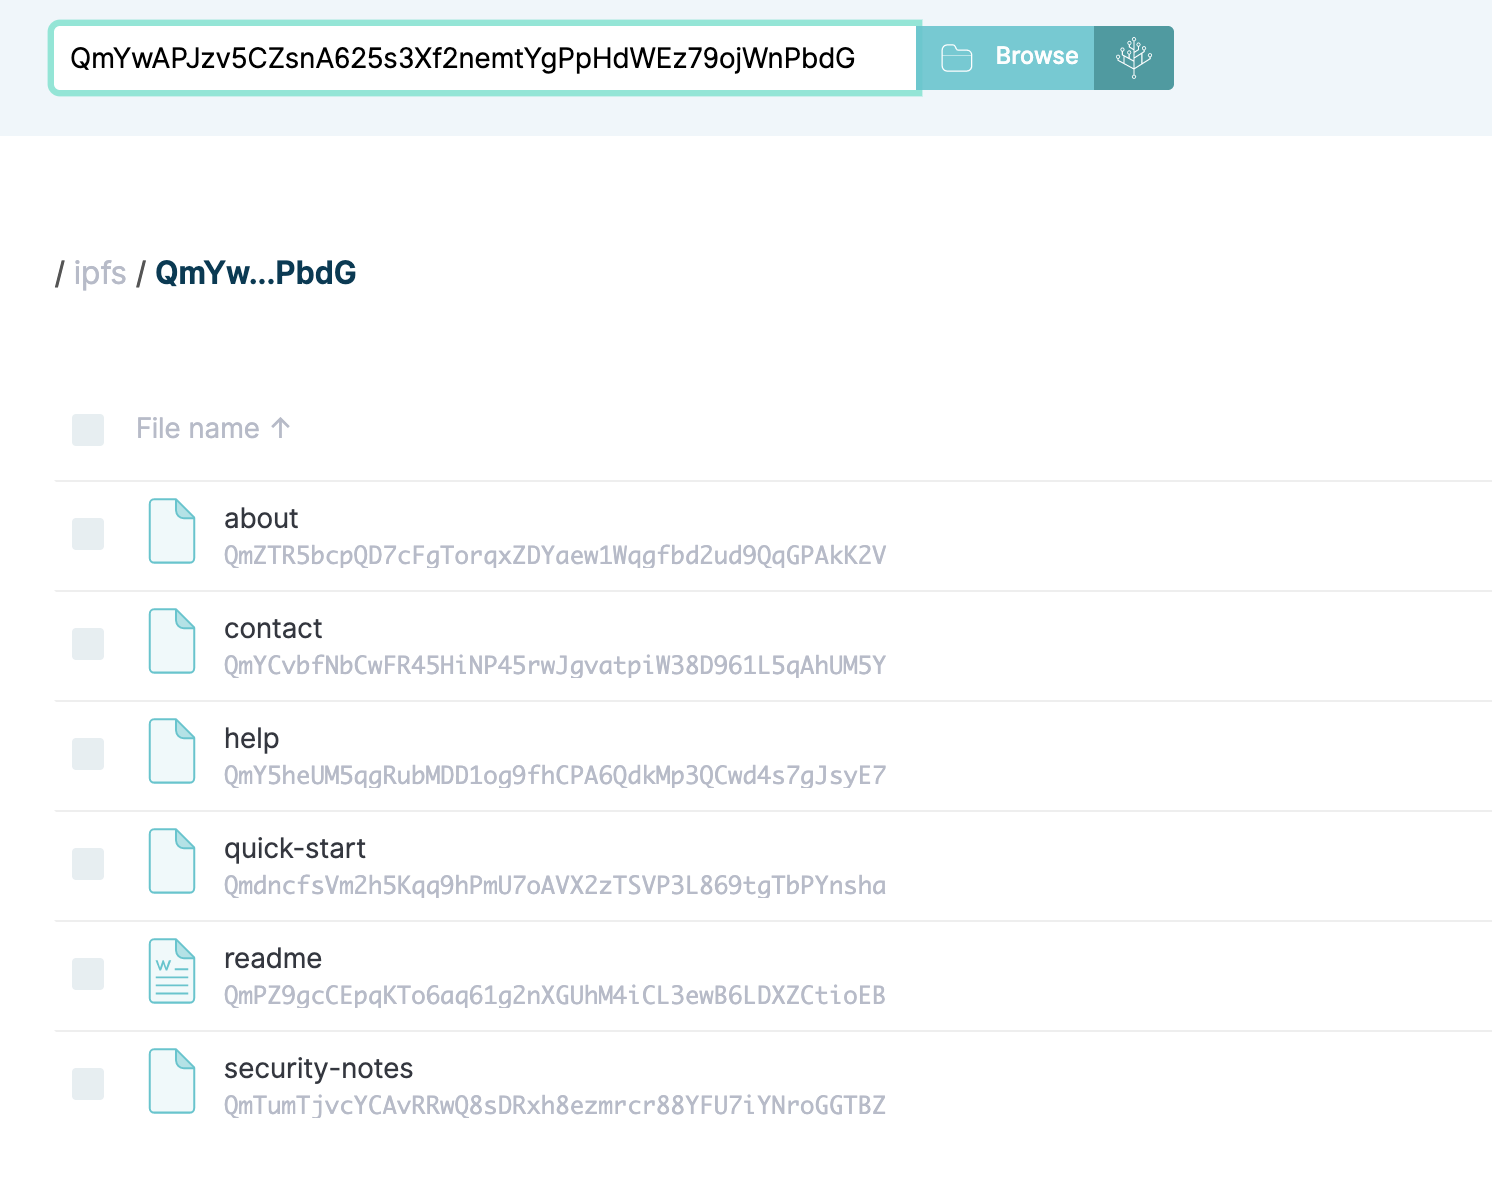
  $ dipfs cat QmYwAPJzv5CZsnA625s3Xf2nemtYgPpHdWEz79ojWnPbdG/readme
  Hello and Welcome to IPFS!

  ██╗██████╗ ███████╗███████╗
  ██║██╔══██╗██╔════╝██╔════╝
  ██║██████╔╝█████╗  ███████╗
  ██║██╔═══╝ ██╔══╝  ╚════██║
  ██║██║     ██║     ███████║
  ╚═╝╚═╝     ╚═╝     ╚══════╝

  If you're seeing this, you have successfully installed
  IPFS and are now interfacing with the ipfs merkledag!

  -------------------------------------------------------
  | Warning:                                              |
  |   This is alpha software. Use at your own discretion! |
  |   Much is missing or lacking polish. There are bugs.  |
  |   Not yet secure. Read the security notes for more.   |
  -------------------------------------------------------

  Check out some of the other files in this directory:

    ./about
    ./help
    ./quick-start     <-- usage examples
    ./readme          <-- this file
    ./security-notes
Now let’s add one of our files to IPFS. For the example, we will generate a file. Since IPFS is effectively de-duplicating content, adding a "Hellow World" would be rather useless since someone likely did it already. So you would not add NEW content to IPFS. Instead, we will use the current date as content, that should be fair enough:
  $ echo `date` > ipfs/staging/myfile.txt
  $ dipfs add /export/myfile.txt; rm ipfs/staging/myfile.txt
  added QmYbdWGwaGjDMzSHDQygAXZsQA559cqesUz19DKgwSfwkt myfile.txt
  29 B / 29 B  100.00%
|
Note
|
In this example, we are adding a text file but you could add a PDF, a whole video, … anything… |
|
Note
|
Notice that we have a little extra work to put the file in a specific location, known my the container |
You will likely add files and content using the IPFS Desktop utility we saw at the beginning of this article. Now lets see how we can pin the content we added to our new server so it keeps on providing those files.
Let’s take the IPFS hash QmYwAPJzv5CZsnA625s3Xf2nemtYgPpHdWEz79ojWnPbdG as example. It may be data from a friend or colleague and you want to help making this content available.
You may use the IPFS Desktop utility to see the content:
$ dipfs pin --help
USAGE
  ipfs pin - Pin (and unpin) objects to local storage.

SYNOPSIS
  ipfs pin

SUBCOMMANDS
  ipfs pin add <ipfs-path>...           - Pin objects to local storage.
  ipfs pin ls [<ipfs-path>]...          - List objects pinned to local storage.
  ipfs pin rm <ipfs-path>...            - Remove pinned objects from local
                                          storage.
  ipfs pin update <from-path> <to-path> - Update a recursive pin
  ipfs pin verify                       - Verify that recursive pins are
                                          complete.

  For more information about each command, use:
  'ipfs pin <subcmd> --help'
$ dipfs pin add QmYwAPJzv5CZsnA625s3Xf2nemtYgPpHdWEz79ojWnPbdG
pinned QmYwAPJzv5CZsnA625s3Xf2nemtYgPpHdWEz79ojWnPbdG recursively
4. Conclusion
We have seen how to use the IPFS Desktop utility, which makes using IPFS a breeze. We have also seen how to install an IPFS node, using Docker, on a server that will be running 24/7.
We have finally seen how to pin content on our server so that our content remains available even when our desktop computer or laptop goes offline.
Wilfried Kopp aka. Chevdor
Building Blockchains & Decentralized Solutions
I build decentralized solutions and tooling to support them. I am developing Smart Contracts and dApps on Ethereum and developing tooling for Substrate (Polkadot & Kusama). I love Rust! I am using Docker extensively and above all I like efficiency. GPG Fingerprint 15AF C574 D3F9 F1C3 CCDD E31E 2DCE C4DC 506E 6475.