Registrar #1 and offline keys
With the recent launch of Polkadot, more and more users use Subkey to generate their keys on a computer that is not connected to the internet to protect their stash as good as possible.
Subkey allows generating keys but also signing a given message using a key. We will see how challenges coming from Registrar #1 can be signed offline using subkey.
You may find other articles related to registrar #1 on this blog.
This article shows how to generate keys and sign a challenge coming from Registrar #1 as well as verify for yourself that the signature is valid before you communicate it to the registrar Operator for verification.
1. Important note about the commands below
All the commands below are left with a trailing $. You should not include this $ as part of the command when you try it on your machine.
Any line starting with a $ is a command you type in your shell, while any line not starting with a $ is the answer to the previous command.
2. Subkey
subkey is a powerful utility part of substrate. It allows generating keys offline. You can read more about it from the Substrate documentation.
We can install it using:
$ cargo install --git https://github.com/paritytech/substrate.git subkey
|
Note
|
For an offline system, we may also download the repository and compile it using cargo install -p subkey.
|
Currently, subkey is at version 2.0.0-rc4 as shown below:
$ subkey --version
subkey 2.0.0-rc4
Once we installed subkey, we can check out its help message and discover everything it can do:
$ subkey --help
subkey 2.0.0-rc4
Parity Team <admin@parity.io>
Utility for generating and restoring with Substrate keys

USAGE:
    subkey [FLAGS] [OPTIONS] [SUBCOMMAND]

FLAGS:
    -e, --ed25519                 Use Ed25519/BIP39 cryptography
    -h, --help                    Prints help information
        --password-interactive    You will be prompted for the password for the key.
    -k, --secp256k1               Use SECP256k1/ECDSA/BIP39 cryptography
    -s, --sr25519                 Use Schnorr/Ristretto x25519/BIP39 cryptography
    -V, --version                 Prints version information

OPTIONS:
    -n, --network <network>      Specify a network. One of
                                 polkadot/reserved1/kusama/reserved3/plasm/bifrost/edgeware/karura/reynolds/acala/laminar/polymath/kulupu/darwinia/stafi/robonomics/datahighway/centrifuge/substrate/reserved43/substratee/reserved46/reserved47.
                                  Defaul
                                 t is substrate
    -o, --output <output>        Specify an output format. One of text, json. Default is text.
    -p, --password <password>    The password for the key

SUBCOMMANDS:
    generate             Generate a random account
    generate-node-key    Generate a random node libp2p key, save it to file and print its peer ID
    help                 Prints this message or the help of the given subcommand(s)
    insert               Insert a key to the keystore of a node
    inspect              Gets a public key and a SS58 address from the provided Secret URI
    inspect-node-key     Print the peer ID corresponding to the node key in the given file
    moduleid             Inspect a module ID address
    sign                 Sign a message, provided on STDIN, with a given (secret) key
    sign-transaction     Sign transaction from encoded Call. Returns a signed and encoded
                         UncheckedMortalCompactExtrinsic as hex.
    transfer             Author and sign a Node pallet_balances::Transfer transaction with a given (secret) key
    vanity               Generate a seed that provides a vanity address
    verify               Verify a signature for a message, provided on STDIN, with a given (public or secret) key
3. Generate a key
Generating a new key is simple, don’t forget to provide the intended network for this account so the address is shown properly:
$ subkey -n polkadot generate
Secret phrase `off wolf insane fiber employ hard balance crouch lend another indoor pencil` is account:
  Network ID/version: polkadot
  Secret seed:        0x4d2977bf2a6fd8b1a722795ae158e37aff284e1eab8b24f1ba4594765398c15e
  Public key (hex):   0x568621a536e51bdff375ba439750a705667b62646f9fdd293ffb3604f923534c
  Account ID:         0x568621a536e51bdff375ba439750a705667b62646f9fdd293ffb3604f923534c
  SS58 Address:       12xSxt1xScihVDWjWBMYoZknMrBVpzU9PbuaMShj6iQ1ZQGs
|
Warning
|
The information above is shared here as educational example. In reality, we should NEVER EVER share, show or expose this data to anyone except for the fields marked public and the address itself.
|
At that point, we will be handling secrets and sensitive data so let’s tell our shell to stop storing our commands for now:
$ unset HISTFILE
Now we may store some of the data above in variables. That makes running the following commands a bit easier as we can simply copy/paste them "as is":
$ ADDRESS=12xSxt1xScihVDWjWBMYoZknMrBVpzU9PbuaMShj6iQ1ZQGs
If we need to recall it, we may issue the following command:
$ echo $ADDRESS
As a result, it will show our address for the Polkadot network.
$ SEED=0x4d2977bf2a6fd8b1a722795ae158e37aff284e1eab8b24f1ba4594765398c15e
4. Prepare the challenge
When you contact Registar #1, you will receive some 'challenges'. Those are strings you need to sign using your keys.
Only you can issue a valid signature from a given account as you are the only one having the private keys. Anyone however can verify the signature using the original message, your signature and the address of the account used to generate the signature.
Before we can use the challenge, we need to prepare the string we received so nothing gets altered in our shell. Concretely, that means we need to store the challenge as a string and escape the double quotes already contained in the challenge.
The challenge we received looks like the one below:
{"account":"12xSxt1xScihVDWjWBMYoZknMrBVpzU9PbuaMShj6iQ1ZQGs","type":"email","token":"DDUNGFOO14YUYXOI","display":"Foobar","legal":"Foo Bar Corp","web":"https://foobar.com","email":"info@foobar.com","twitter":"@foobar"}
|
Note
|
This challenge is a valid piece of JSON. It contains no space beside those you provided in your identity onchain. You should NOT alter this challenge in any way. So not add/remove spaces, do no 'fix' the content of any field. |
You may do that very easily using the The PolkadotJS UI or the node command in your terminal.
Issue the following code will do the trick:
var s = {"account":"12xSxt1xScihVDWjWBMYoZknMrBVpzU9PbuaMShj6iQ1ZQGs","type":"email","token":"DDUNGFOO14YUYXOI","display":"Foobar","legal":"Foo Bar Corp","web":"https://foobar.com","email":"info@foobar.com","twitter":"@foobar"}
var escaped = JSON.stringify(s, null, 0).replace(/\"/g, '\\"')
console.log(`'${escaped}’`)
It produces the following output:
$ node
Welcome to Node.js v12.17.0.
Type ".help" for more information.
> var s = {"account":"12xSxt1xScihVDWjWBMYoZknMrBVpzU9PbuaMShj6iQ1ZQGs","type":"email","token":"DDUNGFOO14YUYXOI","display":"Foobar","legal":"Foo Bar Corp","web":"https://foobar.com","email":"info@foobar.com","twitter":"@foobar"}
undefined
> var escaped = JSON.stringify(s, null, 0).replace(/\"/g, '\\"')
undefined
> console.log(`'${escaped}’`)
'{\"account\":\"12xSxt1xScihVDWjWBMYoZknMrBVpzU9PbuaMShj6iQ1ZQGs\",\"type\":\"email\",\"token\":\"DDUNGFOO14YUYXOI\",\"display\":\"Foobar\",\"legal\":\"Foo Bar Corp\",\"web\":\"https://foobar.com\",\"email\":\"info@foobar.com\",\"twitter\":\"@foobar\"}’
undefined
>
$ CHALLENGE="{\"account\":\"12xSxt1xScihVDWjWBMYoZknMrBVpzU9PbuaMShj6iQ1ZQGs\",\"type\":\"email\",\"token\":\"DDUNGFOO14YUYXOI\",\"display\":\"Foobar\",\"legal\":\"Foo Bar Corp\",\"web\":\"https://foobar.com\",\"email\":\"info@foobar.com\",\"twitter\":\"@foobar\"}"
|
Note
|
Notice that the ' have been turned into ".
|
$ echo $CHALLENGE
{"account":"12xSxt1xScihVDWjWBMYoZknMrBVpzU9PbuaMShj6iQ1ZQGs","type":"email","token":"DDUNGFOO14YUYXOI","display":"Foobar","legal":"Foo Bar Corp","web":"https://foobar.com","email":"info@foobar.com","twitter":"@foobar"}
At that point, you should see the challenge, as it has been sent by the registrar.
5. echo yes, but…
|
Important
|
Before going further, let’s mention a point that may totally break our signatures… |
The command echo does NOT show the content of a variable by default but its content PLUS a new line and that will be an issue if we don’t remove it from the challenge before we sign.
The solution is simple: use -n:
$ echo $SEED
0x4d2977bf2a6fd8b1a722795ae158e37aff284e1eab8b24f1ba4594765398c15e
$ echo -n $SEED
0x4d2977bf2a6fd8b1a722795ae158e37aff284e1eab8b24f1ba4594765398c15e$
echo -n $SEED looks less sexy in our shell but this is the accurate version that is not adding any extra new line at the end.
6. Signing the challenge
At that point, the following command should produce a similar output:
$ echo $CHALLENGE; echo $SEED
{"account":"12xSxt1xScihVDWjWBMYoZknMrBVpzU9PbuaMShj6iQ1ZQGs","type":"email","token":"DDUNGFOO14YUYXOI","display":"Foobar","legal":"Foo Bar Corp","web":"https://foobar.com","email":"info@foobar.com","twitter":"@foobar"}
0x4d2977bf2a6fd8b1a722795ae158e37aff284e1eab8b24f1ba4594765398c15e
We are ready to sign!
$ SIG=`echo -n $CHALLENGE | ./target/release/subkey sign $SEED`; echo 0x$SIG
0xec5f502dcebcfed790f0c8bdd81e8584653c2067673d897d731d4e8e273d011a44fd9085430ef7d97bcdacc86da7fdd911c668b21ec28c785907af3619946d87
Not only this command shows the signature but it also stored it under the SIG variable.
|
Note
|
The signature will differ everytime you run the command. Each of the signature you generate is however totally valid and can be verified. |
7. Checking the signature
To verify a signature, you need: - the original message, what we call `challenge`here - the address of the account that signed the message - the signature (no kidding !?!?)
I am joking on the last one but you will see below that it is important.
7.1. Using the PolakdotJS UI
It is trivial to check a signature using the PolkadotJS ui: - head to https://polkadot.js.org/apps/#/toolbox/verify. - provide the address of the account that signed - provide the original message / challenge - provide the signature
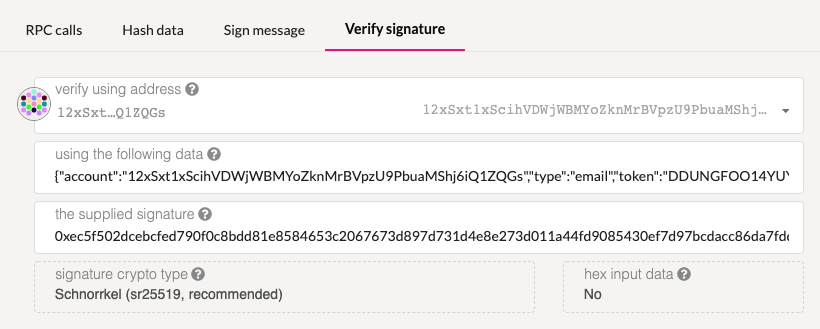
There is an open PR that will fix the fact that the UI no longer shows a 'green success' for a valid signature. By the time you read this article, the issue is likely already fixed.
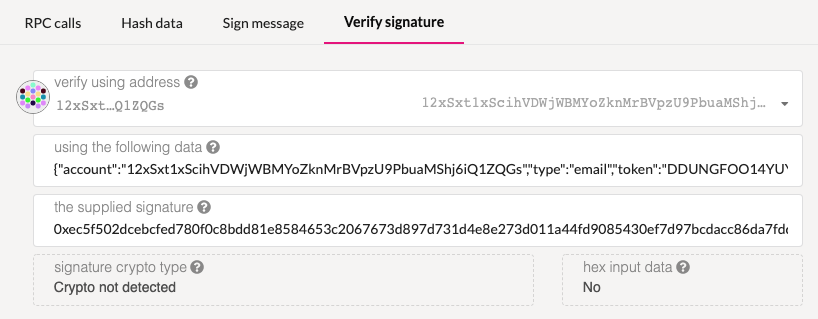
|
Note
|
Note the "Crypto not detected" which indicates that the signature is invalid. |
7.2. Using subkey`
Since we stored all the relavant information previously in variables, the following command should work "as is":
$ echo -n $CHALLENGE | ./target/release/subkey verify $SIG $ADDRESS
Signature verifies correctly.
The output is rather self explanatory.
|
Warning
|
Don’t get fooled as I did (See Github issue), to verifiy a signaure, you pass the address of the signer account and not its seed.
|
8. Extract the signature
Having the signature on the offline computer, the user can extract the signature saving it to a removable media such as a USB flashdisk, or better a "write only" CD/DVD or simply write down the signature on a piece of paper.
9. Conclusion
We have seen how to use subkey to generate an account, sign and verify some signatures.
This knowledge is valuable and can be used for many applications.
Wilfried Kopp aka. Chevdor
Building Blockchains & Decentralized Solutions
I build decentralized solutions and tooling to support them. I am developing Smart Contracts and dApps on Ethereum and developing tooling for Substrate (Polkadot & Kusama). I love Rust! I am using Docker extensively and above all I like efficiency. GPG Fingerprint 15AF C574 D3F9 F1C3 CCDD E31E 2DCE C4DC 506E 6475.